

Facebook ads 101 part 1: Learning something new never goes out of style
The use of social networks has increased dramatically in the wake of COVID-19. With people staying home and working remotely, there is an increase in time spent with our laptops, tablets, and smartphones. With many traditional media forms and events being put on pause, Facebook Ads provide a platform to reach people while we’re all keeping our distance.
At this time you might be trying on a few different hats. One of those hats might see you buying Facebook Ads for the first time or the first time in a while. Whether it’s curiosity or necessity that has you perusing the shelves of the millinery shop, we’re here to provide you with a two-part guide to get you started with Facebook Ads.
Part One is a guide to setting up a campaign to generate traffic to your website.
Part Two will dive deeper into audience segments, the Facebook pixel, and developing strategy.
The foundation of a successful Facebook Ads campaign is a clear objective.
Do you want traffic to your website, engagement on your facebook page, increased sign ups for your newsletter, ecom purchases or something else? Once your objective is clear, it’s time to start building a campaign.

If you’re completely new to Facebook Ads Manager, it might take a minute to get familiar with the platform, and there is a chance that the version of Ads Manager you’re using looks different than the examples that follow. Don’t worry, this is part of navigating the digital ad buying landscape. My recommendation: stay curious and don’t be afraid to ask for help.
For this example, we will build a campaign to generate traffic to your website. Since storefronts are mostly closed, think of your website as your new storefront and Facebook as the street. We’re going to get digital foot traffic through your door to show people what you have to offer.
We're going to set up a couple of assumptions here so we can all get on the same page
- You have a business with a website
- You or someone on your team can or has installed the Facebook Pixel on your website.
- You have $200 to spend for one month.
A note on campaign, ad set, and ad naming
Keep names short and meaningful. Include things like the date and objective at the campaign level. Audience description information at the Ad set level. And describe the creative in the ad name. Develop some conventions that are relevant for your application and keep them consistent. Your future nerdier self will thank your current less nerdy self. Trust me on this one.
Campaign Creation
At the campaign creation phase, you’ll set up some high-level parameters based on the marketing objective. The settings chosen here change the available options in the steps that follow.
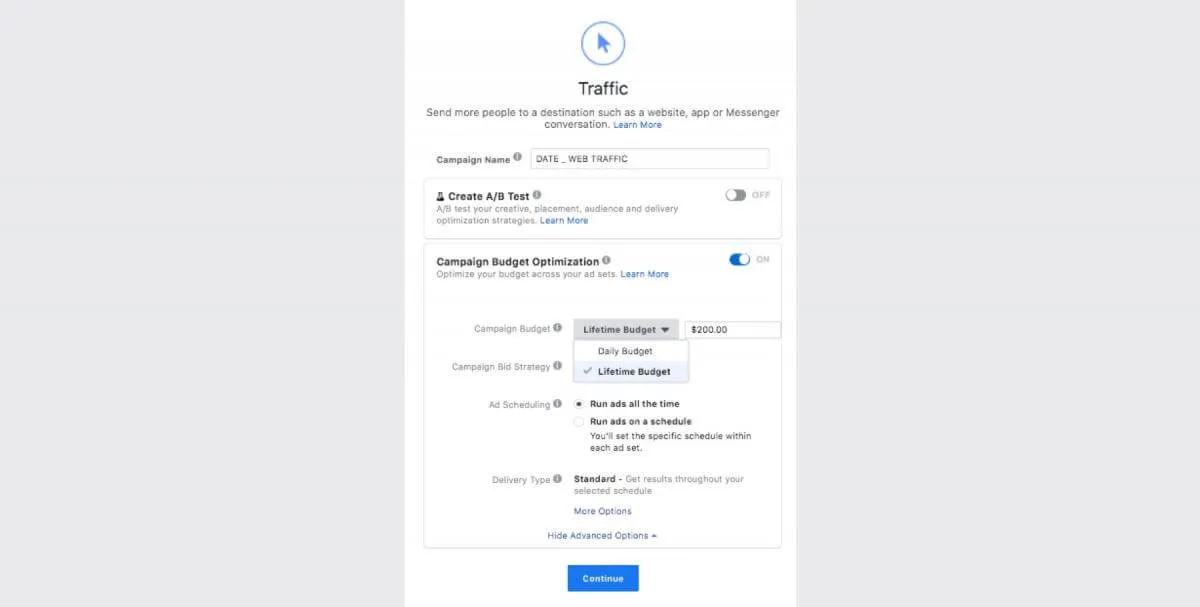
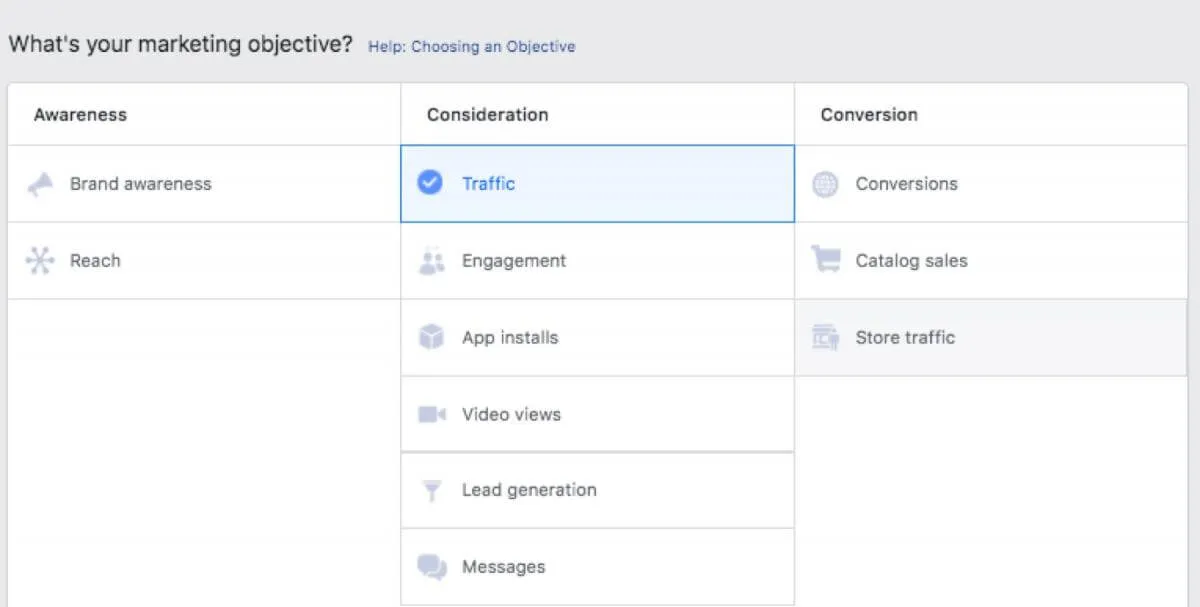
For our website traffic generation campaign, we’ll select traffic as the marketing objective, after which, you’re given a number of choices to allow for A/B testing. Creating an A/B test allows you to generate significant results when testing two variables. One of the great things about Facebook Ads is you can test more than two variables at a time and get significant results. More on that later. Unless you are strictly looking to test two variables and you have a budget designated for a test, leave that turned off.
Campaign Budget Optimization
When this is turned on, your budget is set at the campaign level. What does that mean? Well, this means you are going to let the Facebook Ads algorithm do some of the heavylifting. It also means you can test multiple variables simultaneously.
Here is a simple chart that demonstrates how campaign optimization works:
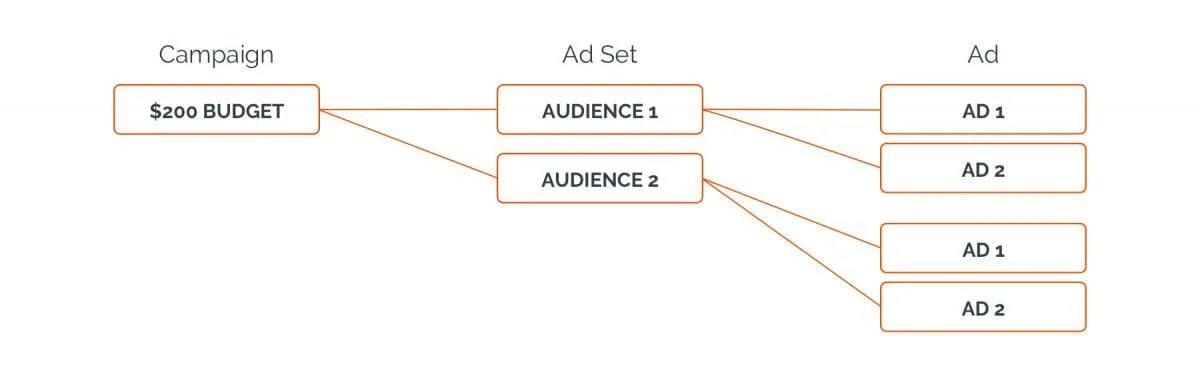
Using Campaign Budget Optimization and setting the budget at the Campaign level allows you to test multiple audiences and multiple ads without setting specific budgets for each audience. When the account is set up this way, Facebook will test all variations and automatically reallocate more budget to the audience and the ad with the best results.
Lifetime budget vs. daily
This depends mostly on your budget and how long you plan to run your ads. If you know you have $200 to run for 30 days, I would recommend setting a lifetime budget. Facebook will spend exactly $200 and pace it out over the month, allowing for some daily fluctuation based on performance.
Ad Set Creation
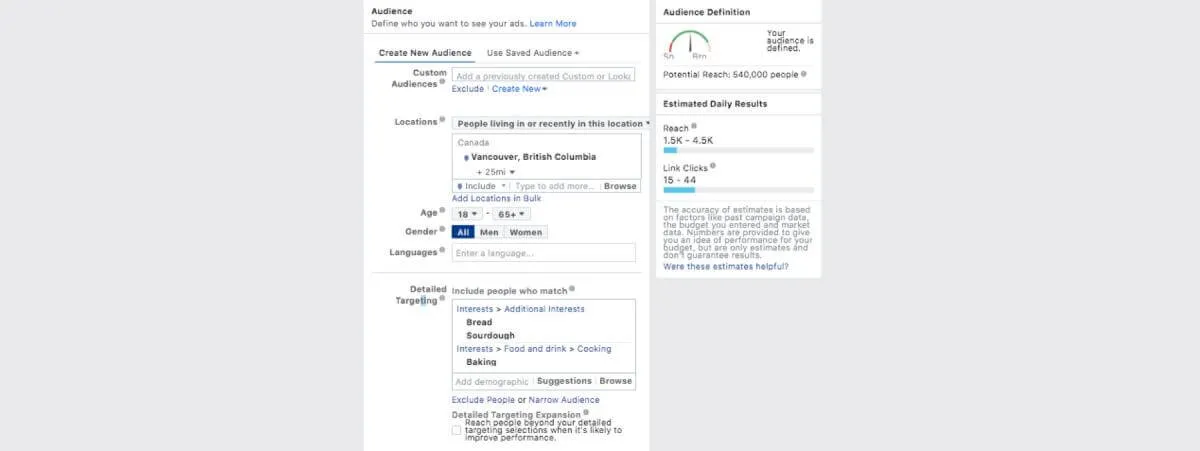
At this stage, we select all our criteria for the audience we want to reach. Dynamic Creative and Offer are great tools and we will look at those more in part two. For this example, let’s say your website sells baking tools and offers online baking classes. You want to capitalize on the sourdough craze and want to reach people near Vancouver.
Your ad set audience could look something like this:
Next you'll see something like this

Since we’re testing at this point, leave it to automatic. Your ads will show up everywhere they are eligible and you can check in on results to decide to limit some placements later.
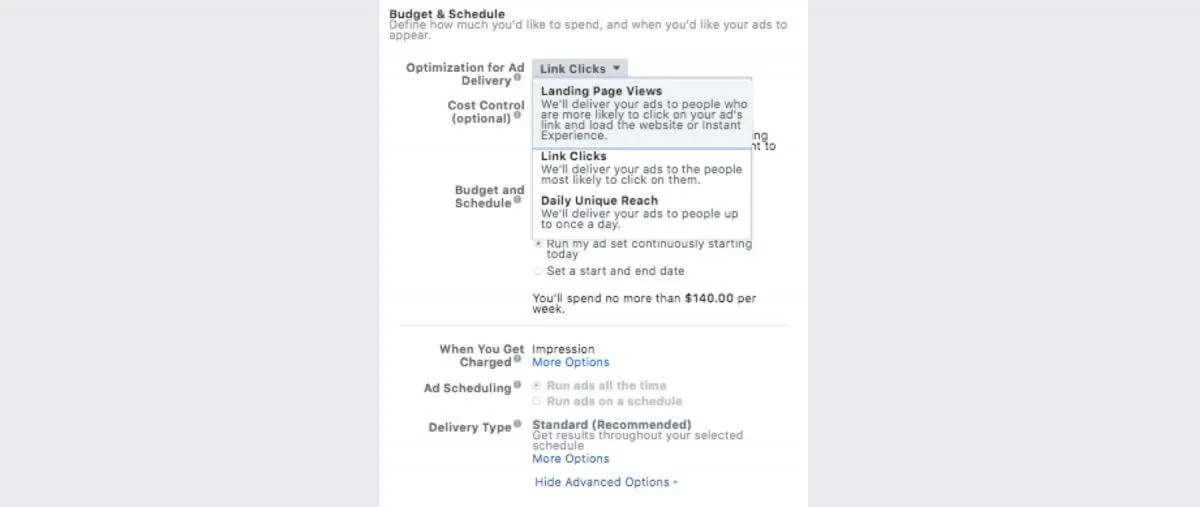
Next, there is another chance to fine-tune the objective. There are two ways Facebook can measure traffic. Link Clicks and Landing Page Views. Link Clicks are measured when someone clicks the link or CTA in your ad. Alternatively, if you have the Facebook Pixel enabled you will be able to select Landing Page Views. This is a more accurate way of measuring traffic. A Landing Page View is measured when the user gets to your website and the Pixel reports back to the Facebook Ad account. The pixel also allows you to build custom audiences based on people who have visited your site.
Next set the duration of your campaign

Duplicate this Ad Set within the existing campaign and select a different audience to test against. If you already have a Facebook page, you can build an audience based on people who like your page or a Look-a-Like of those people. If you have the Facebook Pixel on your site, you can remarket to people who have already been to your site and create segments based on pages they visited. We will look at this in more detail in part two.
Ad Creation
Now is the time to dust off those graphic design skills and discover your inner copywriter. At this stage, you can create an ad or promote an existing post. Promoting an existing post is similar to boosting a post, but by promoting it through Facebook’s Ad Manager you have more control of your audience targeting and you get more delicious data to dissect on the back end.
We’re going to create two ads for each ad set. You can create as many ads as you want, but keep in mind that having lots of ads in your ad set spreads the budget thin. This can slow the platform's learning process or limit some ads from being shown.
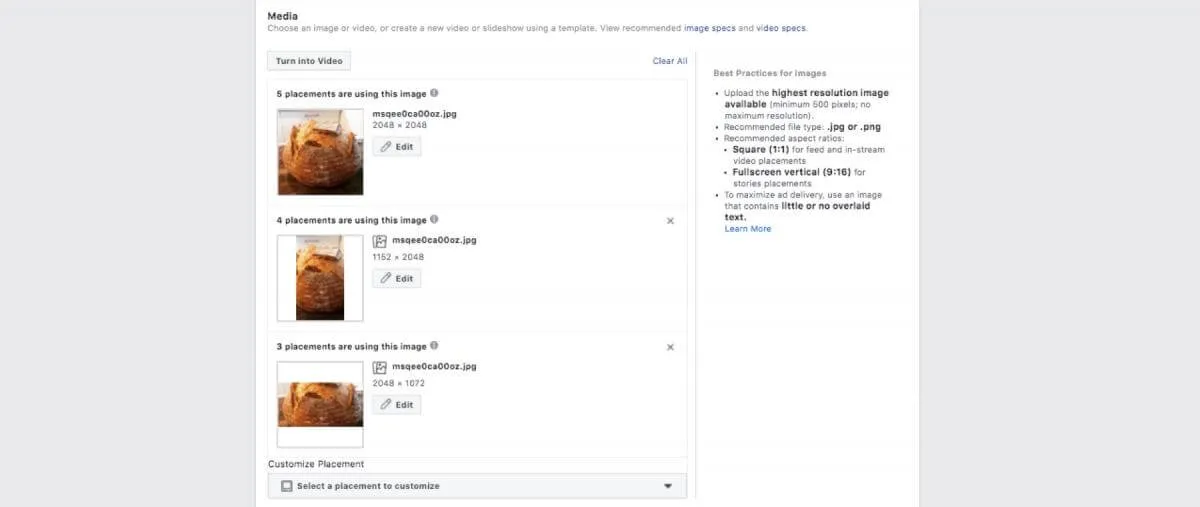
Select the type of ad you want to create. For the sake of this example, we’ll make a single image ad, duplicate it and create a variation to test against.
Once you’ve uploaded the media, Facebook gives you the opportunity to crop and adjust based on ad placement. Since we selected automatic placements earlier we’ll see our image in a number of examples. Here you can cancel placements where your media doesn't suit the format or upload media specific to that placement.
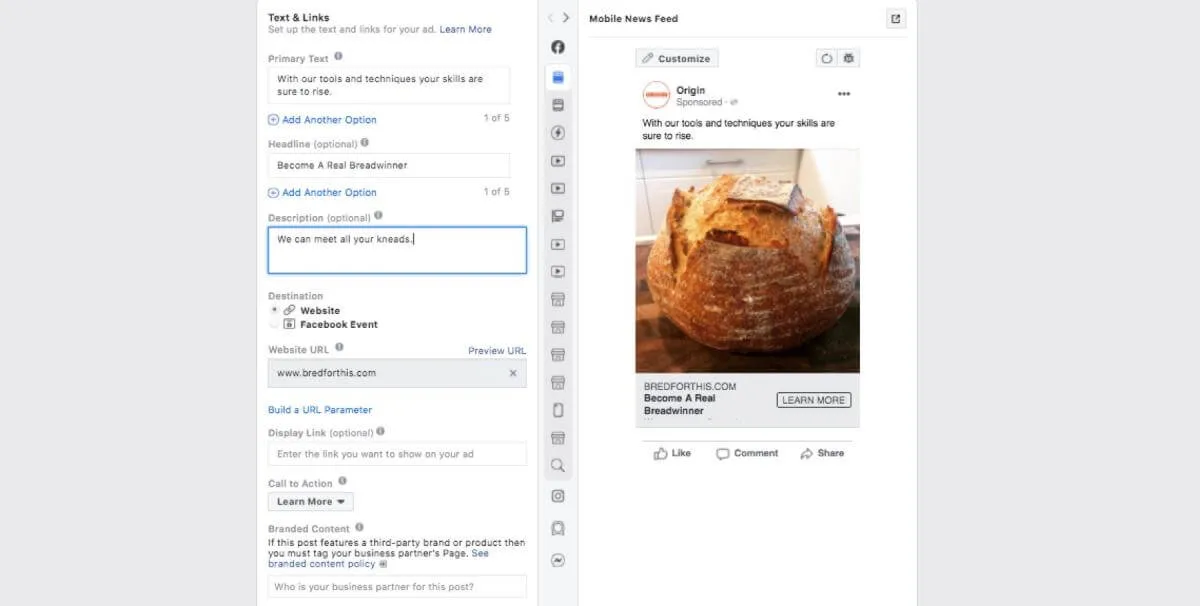
Now you can add your primary text, headline, link description, and your website URL. The website URL is the page on your site where people will land after clicking on the ad. Select a CTA that is suitable and you're pretty much done your first ad. Duplicate this add in the existing ad set and create a second variation to test a different image or copy or both.
You have the option here to connect the Facebook Pixel and build custom tracking parameters. We’ll get back to this in part 2 when your future, nerdier self will be thankful for your simple naming conventions.
Go back over your settings, proof your copy and then hit confirm. Facebook will start publishing your ads. After Facebook has reviewed your ads they will start showing up in your audience’s news feed.